Tutorial: Create an Architectural Diagram using SketchUp
This guide breaks down the complete process of creating dynamic architectural diagrams, from importing site data to generating animated shadow and symbol analysis videos using SketchUp and two free plugins: Sun Diagram and Dynamic Symbols
Applicable for:
Site analysis diagrams
Sun path and shadow studies
Architectural diagram
and more
Softwares used:
SketchUp: Modeling and editing 3D before export
Sun Diagram Free: https://sundiagram.com/
or: https://extensions.sketchup.com/extension/5aa1ab3d-36ff-4510-ae63-84f677a36f3a/sun-diagram
Dynamic Symbols Free: https://dynamicsymbols.com
or: https://extensions.sketchup.com/extension/21085584-a984-474d-8407-33087adec402/dynamic-symbols
All Resources used in the tutorial are included
All project files (2D + 3D) are included
Let’s get started.
Tutorial (step-by-step guide and videos):
Step 1: Import Terrain and Map Data
Step 2: Generate Contour Lines
Step 3: Create a 3D Sun Path using Sun Diagram Plugin
Step 4: Add Symbols with Dynamic Symbols Plugin
Step 5: Create a Shadow Analysis using Sun Diagram
Step 6: Generate dynamic symbols to represent the Site analysis
Let’s get started !
STEP 1: Import Terrain and Map Data
- Go to File, then Add Location.
- Enter the location name or coordinates.
- Click Set Location, then select Add Context.
- Choose the elements you want to include: Elevated site, Map texture, and Terrain mesh.
- Highlight the area you want to focus on and click Import Site Context.
- SketchUp will automatically download terrain data and satellite maps
STEP 2: Create Contour Lines
- Turn off the House and Trees tags, keeping only the Terrain model visible.
- Draw rectangles at 10-meter intervals, perpendicular to the terrain.
- Group them into Components.
- Create evenly spaced rectangles every 5m and duplicate them 20 times.
- Use Intersect Faces, With Model to generate intersections between the planes and terrain. These intersection lines become the contour lines.
- Delete any unnecessary flat surfaces, keeping only the contour lines.
- Highlight the contour lines by reducing the opacity of the satellite map texture.
- To ensure shadow reception when the satellite map opacity is low, create another identical terrain layer, Explode it , fill it with white, and place it slightly below (e.g., 0.2m gap) the satellite image layer.
- For uneven terrain, turn off the shadows cast onto the ground and keep only the shadows on the faces
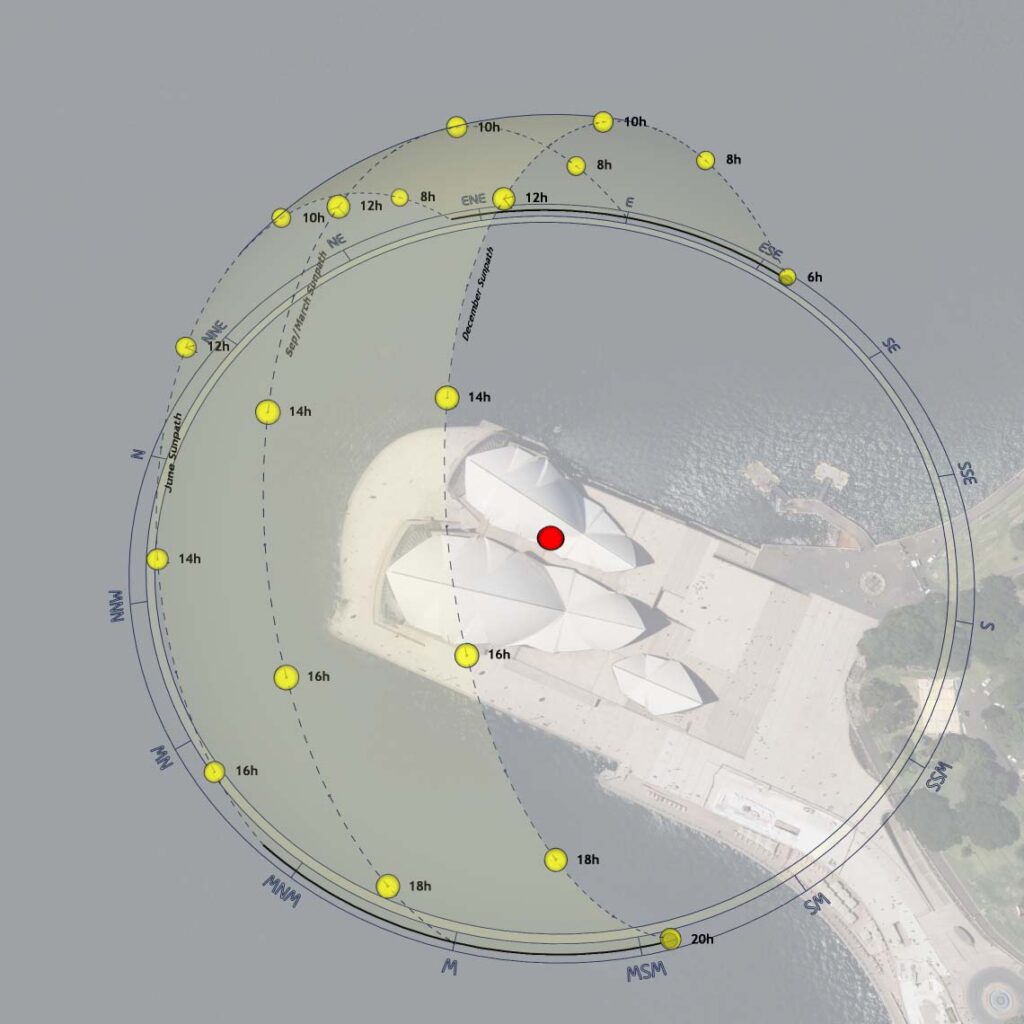
STEP 3: Create a 3D Sun Path with Sun Diagram Plugin
- Search for “Sun Diagram” on the Extension Warehouse within SketchUp and install it.
- Use the first feature of the plugin to create the 3D Sun Path.
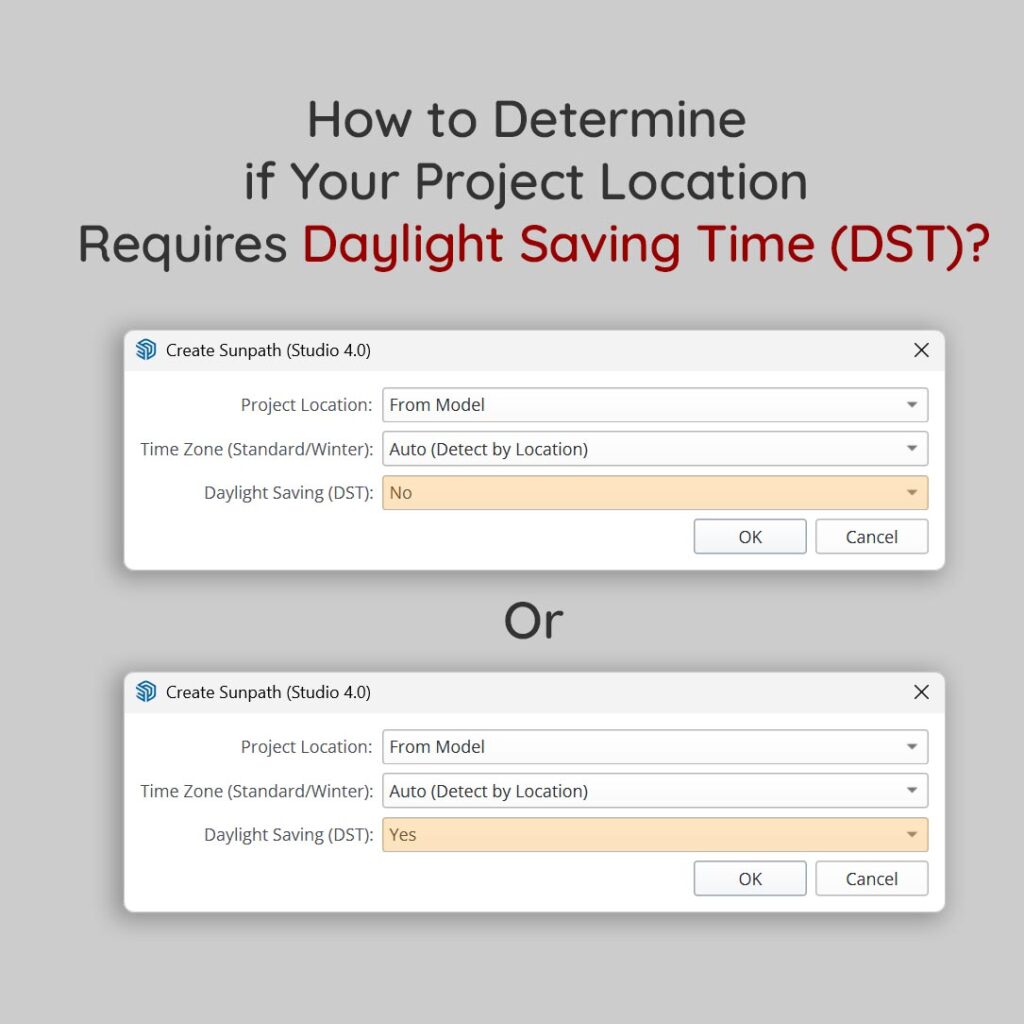
- Check if your region observes DST; select “No” for the DST option if it doesn’t. (Note: Activating DST may require the Pro version ).
- Move and scale the 3D Sun Path to fit your view; this won’t affect the shadow results.
- Select the display style of the diagram using the 4th feature of Sun Diagram (e.g., choose Style 01 for a bright-style diagram).
STEP 4: Add Symbols (Wind, Views, etc.) with Dynamic Symbols Plugin
- Install the free Dynamic Symbols plugin from the Extension Warehouse.
- Use the first feature to generate a symbol.
- Click “Add” on the symbol you want to use.
- Rotate and scale it to fit your diagram.
- Color the symbols using the 3rd feature of Dynamic Symbols, or use SketchUp’s default materials.
STEP 5: Create a Shadow Analysis using Sun Diagram
- Turn off the Dynamic Symbols layer (tag).
- Use the 3rd feature of Sun Diagram to perform the Shadow Analysis.
- Select the time range.
- Choose the image save location and set the image resolution.
- Click “Apply” and wait for the plugin to export images for each time within the selected range.
- Combine the images into a video using Photoshop, Capcut, or similar software.
- In Photoshop, use the “Load Files into Stack” script to load all the images.
- Use the Timeline feature, select all layers, and click Create Video Timeline.
- Set the timeline frame rate to 1 frame per second.
- Use Convert frame, make frame from clips.
- Export the file as a video.
- Repeat the process for multiple months (e.g., December, June, and September).
STEP 6: Combine Images and Videos into a Final Animated Diagram
- Turn off all layers, leaving only the Dynamic Symbols layer (or tag) visible.
- Use Function 2 of the Dynamic Symbols plugin to animate them.
- Select the symbols and click “Create Scenes”.
- Check the “Animation” setting in “Model Info” and set the value to 1 second.
- Verify the changes by pressing “Test Animation”.
- Set up only the desired scenes (e.g., Feb_F1, Feb_F2, and Feb_F3) to be checked for “Include in Animation”.
- Go to File, Export, Animation.
- Inside the Export Options, remember to uncheck “Loop to starting scene”.
- Click OK and wait for the software to export the video.
- Open Photoshop or any video program to combine the videos.
- Use File, Scripts, Load Files into Stack to choose and merge the two recently exported videos (Shadow Analysis and Dynamic Symbols).
- Put the dynamic symbols video layer above the shadow analysis video layer.
- Remove the white background of the dynamic symbols video layer using the blending option (slightly drag the white color handle of the current layer).
- Reduce the opacity of the dynamic symbols video layer a little.
- Export the final combined video.
Final Result
That’s it! 🎉 You now have a complete architectural diagram animation combining Sun Diagram and Dynamic Symbols.
If you found this tutorial useful:
👉 Leave a comment and share your results.
👉 Follow us to get updates on new workflows and free resources.

About the Author
Nam Nguyen
Architect & Software Developer | Founder of Febhouse & ArchiDiagram
I build tools like Sun Diagram, Dynamic Symbols, and Shadow Slice to help architects work smarter.